Don’t ever get rushed into learning anything. That’s why we had designed this course to teach you from the beginning, may be many of other websites did not focus on these topics. But we are here to explain you each step of Photoshop basic.
So In previous tutorial we learn about working space of Photoshop. Now we will tell something about getting started with your projects.
Create New Document
- Firstly when you open your Photoshop. You have to start up with a new document.
- To create a new document go to File (in main menu) > New
Shortcut key to create new doc is Ctrl+N. Now when you press New or Ctrl +N you will see a panel with some options.
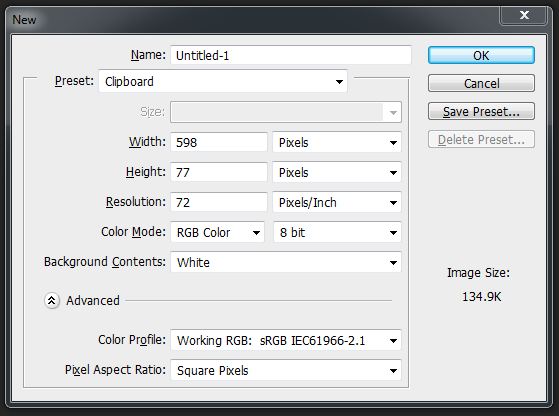
Name is to define name of your project.
In Preset you will get a drop down list which consist of some options like Web,Photo,International paper etc.
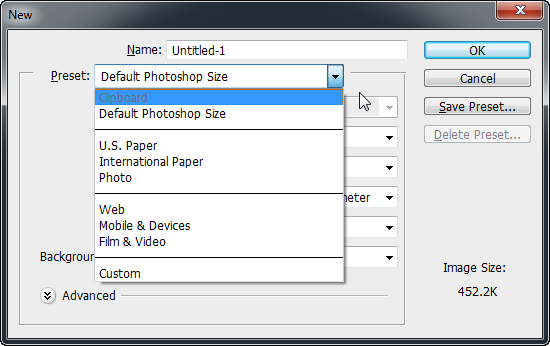
If you want to make some print material you can use U.S. paper , International or photo, then choose appropriate size from Size drop down list.
And for web material just choose Web and choose size of your wish.
You can set size custom width and length and also choose the units

After that you can see color mode
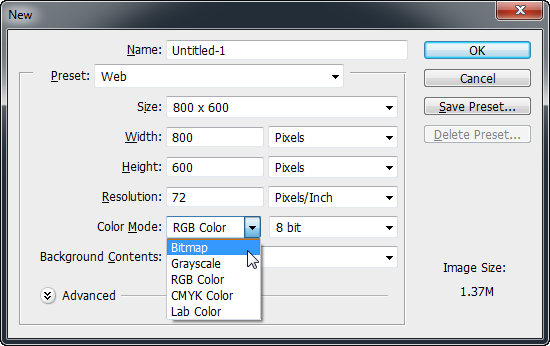
For beginners it is enough to know that,
- RGB mode (red green blue) is used to see colors on monitor it is basically used to make Computer Graphics and web contents.
- CMYK (cyan magenta yellow krypton) is used for printing purpose.
- The grayscale mode contains only one channel, but unlike the bitmap mode it can have intensity levels from 0 to 255. The Grayscale mode is useful if you are outputting the image to a non color printer.
- Most common use of the bitmap mode is outputting the image to a black and white laser printer.
Now next to it you can see bit option, 8 bit 16 bit and 32 bit. For now you can understand by this that more in number equals to more in quality but with that more in file size also.
Then below that you can see background color by which you can set background color of your document. Now here you are set to work on your new file.
Save Your Files
In this tutorial we will learn about saving and opening our documents.
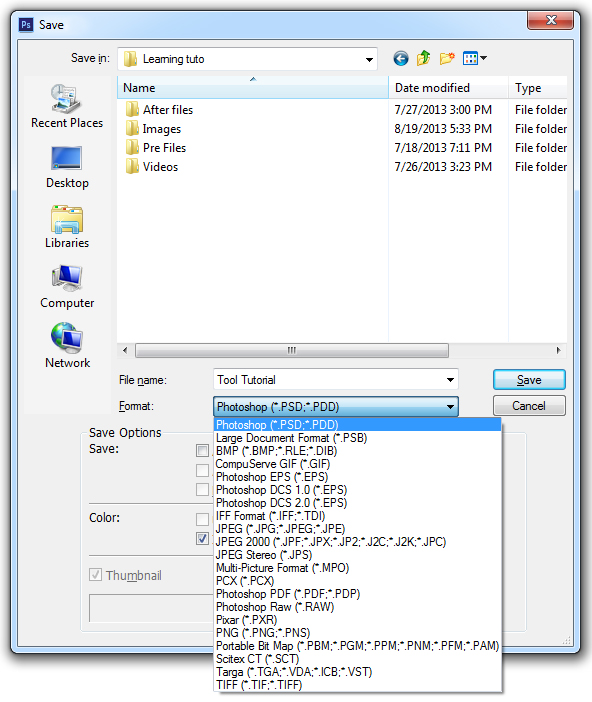
To save your document go to File > Save or Ctrl+S ,name your file and by default it will save your file in Photoshop format its extension is .psd.
To save your file in other formats like jpeg , png etc simply click on present format a drop down list will be appear and you can select format of your choice.
- Save as option : It is basically for saving a copy of your document . you can use it by just Ctrl+ Shift + S or go to File >Save as
- Save for web and devices: When you want to save something for web, it should be light in size and will be in a proper size , same in the case when saving for mobile, so at that time this option is useful .
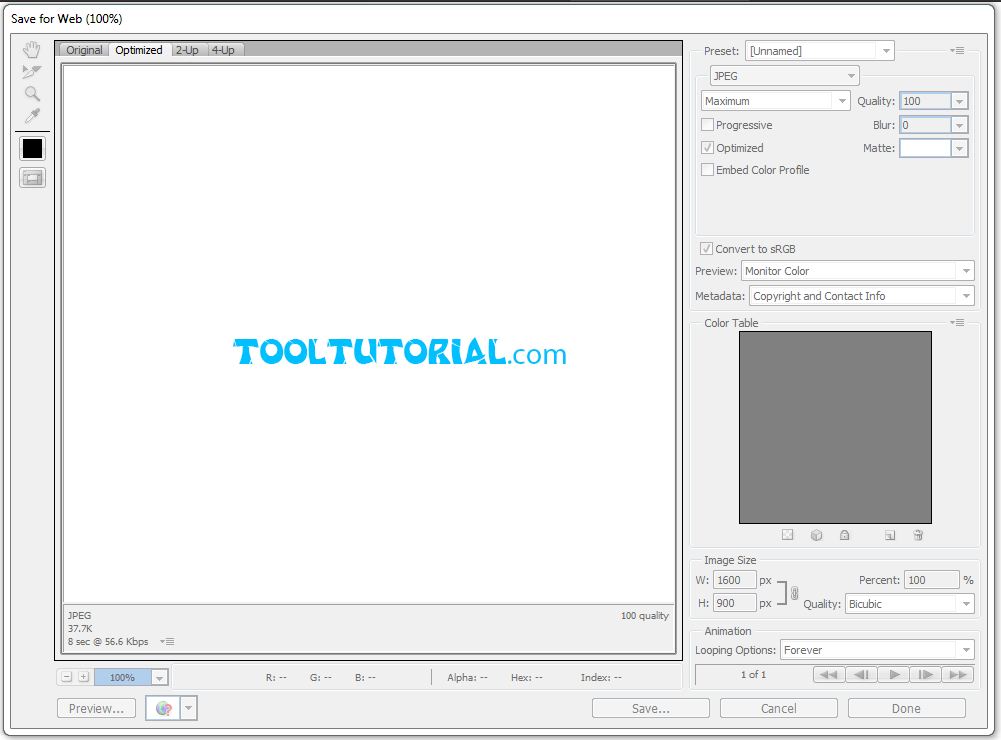
This window will be open for save for web and devices in which you can choose format, image dimensions, quality and you can see image size in left bottom corner. It will be explain separately in HOW TO SECTION.
Open and close a file
It is simple thing to open a file you can just drag psd file or any image and drop it into Photoshop or you can go to File > Open . Now for photographers who like to have all controls on their photographs there is “Camera Raw“.
Close file to close recent document and close all to close all documents.
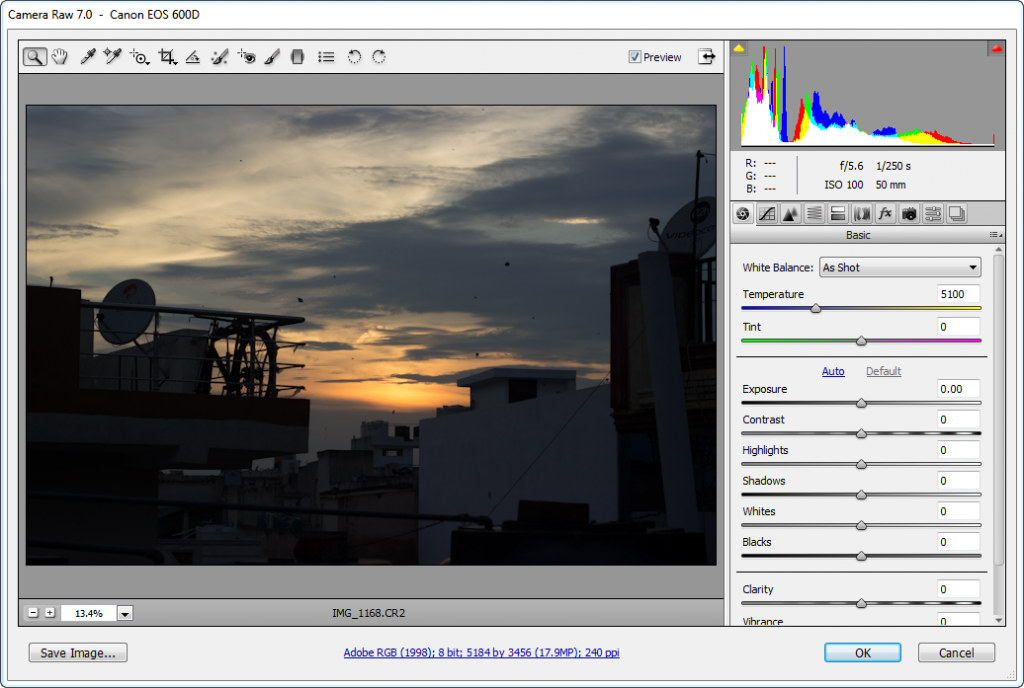
In this also you can drag and drop your RAW file in Photoshop and before opening your image a pallet of Camera raw will be open in which you did all post processing and then image will be open as normal document for retouching. Camera Raw pallet will be explained in separate tutorial CAMERA RAW.
TUTORIAL IN DEPTH
It is a initial step to start a project, so let start with it only. There are multiple ways to start with a new project in Photoshop.
Firstly we can see New option in File menu. Just click on it or its shortcut is Ctrl + N. After this you will see a window with some options to start with your new project. In this you have to specify everything about your document, like its name, size, dpi etc. It will be explained separately in this tutorial only.
But before that we have one more way to start with a new project, like we have to edit a image, so we can only drag and drop that image in Photoshop and it will automatically became a new document, and it will take image property only. Like image has 1024*768 pixel size so document size will also be same. And same like that document take image color mode , dpi etc.
Now coming back to new document window
Firstly we have name option.
Specify your project name, you can rename your .psd anytime just like any other document.
Here we have some presets like U.S. paper , international paper, photo , web etc.
You can select any of them from list and after that can select sizes from its preset category only.
Like International paper has preset sizes like, Letter, A4, A3 etc.
On top of preset list we have Clipboard, Sometime it is very useful.
Clipboard it that size which we copy by making selection in Photoshop only.
Like here I make a random selection in 1000 X 1000 pixels canvas and copy it .
Now when i make new document with clipboard preset it take size of that selection only.

In last of preset we have custom, by that we can set everything according to our need.
Set width and height, choose your preferred units, like pixel, cm , inches etc.
Resolution – Set resolution, according to type of document. Resolution means DPI ( dots per inch) or PPI , pixel per inch. More pixels or more resolution means better quality and higher document size.
Resolution varies for different purpose, like printing , web , color printing, needs different dpi.
It is explained in Image size and resolution chapter in details.
Color Mode – Different colors modes use for different purpose.
Main color modes are RGB and CMYK.
RGB is used for computer or web graphics. RGB means Red , green and blue.
CMYK is used for printing and publishing purpose. CMYK means Cyan, Magenta, Yellow and Krypton (black).
The grayscale mode contains only one channel, but unlike the bitmap mode it can have intensity levels from 0 to 255. The gray-scale mode is useful if you are outputting the image to a non-color printer.
Most common use of the bitmap mode is outputting the image to a black and white laser printer.
Background Contents – By this you can specify a color of background layer, or you can also keep it transparent.
Like this we are ready to start with our document.
Now let see some more options related to document in Photoshop.
How to open a Photoshop document ?
If you want to open your existing Photoshop document in Photoshop, go to file menu select open, a window will open choose your document for location and press open.
You can also just drag and drop Photoshop file in Photoshop to open it.
Or just double click on Photoshop file and just like any other document, it will open in its specific software that is Photoshop.
How To save Document?
After doing lots of work on a project, we have to save it, Go to file menu > select save
Short cut is ctrl + s
For all shortcuts go to Photoshop Shortcut .
Can give name, and choose format of your file, like if you have to save its project file save it in .psd format or if you want to save it as image you can save it in jpeg or any other.
While saving as jpeg image you can specify its quality which effects image size.
In separate tutorial I explained about popular Formats.
Save As
Save as is just like saving a project with a different name or in a different format..
Go to file menu > and select save as, shortcut for save as is Ctrl + Shift + S
For all shortcuts go to Photoshop Shortcut .
Else than this everything is same in saving a document.
Save your work in some interval of time , as your time is important and if your system crash or hang it hurts if you are working on a project and forget to save it.
How to save for web and devices ?
Sometime we have to save our images for web or for devices like mobiles, tab etc.
For that we have to take care of image size , its dimensions, quality and its format.
Go to file menu > select save for web and devices. A window will be open and you will got all options here to control size of your image, quality and its format.
Shortcut is ” F2 “
For all shortcuts go to Photoshop Shortcut .
In left bottom corner you will see size of image.
In center of screen you will see your image.
It also has been explained in details in How to section.
Now after packing up with your work, you have to close your document.
One option is to close Photoshop.
Or if you don’t want to close single document, go to file > select close. Shortcut for closing document is Ctrl + W .
But if you want to close all document, and don’t want to close photoshop.
Select close all in file menu. shortcut for closing Alt + Ctrl + W.
For all shortcuts go to Photoshop Shortcut .
Camera Raw
Camera RAW is a type of image file, usually captured with DSLR camera. Raw files have lots of possibility to play with your images and whole control over color correction.
Camera raw files have .CR2 extension. It can be import in Photoshop by just dragging into Photoshop and a camera raw pallet will open. You can edit your image in it and then press open , by that it will open as a Photoshop document in which you can do further editing.
You can also import as many as files in camera raw by just selecting files and drag it in Photoshop.
Working with camera raw is also a better way to edit images and color correction. I will say to all photography enthusiast that always click in raw format and to have most out of your photographs.
Camera raw working is explained separately in Camera Raw tutorial.
Now coming to Adobe Bridge
By this you can find any of your files of any format, just go to file menu > browse in bridge.

In this you can search files according to specific format , like photoshop files .psd, 3d max files .max, adobe illustrator files .ai .
Browsing files is much easier in adobe bridge, so try it while searching for your files.
Now you are ready to get start and go with your creative journey of Photoshop.
In coming tutorial , our journey will be full of interesting activities on Photoshop.
Once you will completed with this basic tutorial, it will be easy for you to make your own creations and edit pics in your own style in Photoshop.
Do this practically once you get familiar with this, it will easy to start up with your projects and if you have any problem in this tutorial, ask your questions in comments of this tutorial.
On top of this tutorial, we have video of this tutorial. By which you can see these all topics practically.
This tutorial come to end and in coming tutorials you will learn how to set our Workspace and Canvas.
Thanks for visiting tooltutorial.com. If you have any questions, You can surely comment them down, and we’ll be there to reply!


