Firstly an overview about Photoshop. It is a all-in-one software to complete your all needs regarding Print or Web Media, whether you are professional, beginner or just looking to edit your personal pics. Photoshop is for you.
We are not only in market to teach Photoshop. But we are committed to teach it to you in a professional manner. We are focusing on Step by Step method So, Don’t jump to last step in first stage. Just follow us by learning all tutorials as per our Course Module.
So here we are getting started with Photoshop
Now before mixing up with tools and techniques let us know about how Photoshop looks likes and about its works space.
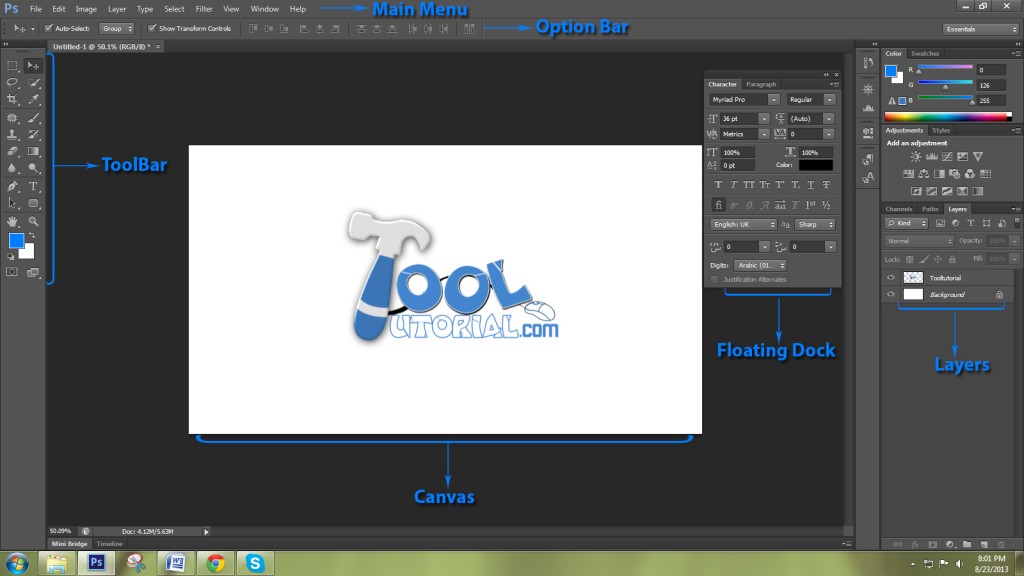
Main menu :
On the top of the screen you will see Main menu. It includes File, Edit, Image, Layer, Type,Select etc, so it is actually a “Main” menu as from here you get access to every feature of Photoshop.
Option Bar :
Below main menu you can see option bar, it is a dynamic bar which will change according to the selected tool. Every tool has its specific option by which you can have control over it .
Tool Bar :
It includes all tools by which you can create anything. Tools are set in different types like selection, type ,painting ,shapes and retouching. Tools are most important thing to be learned in any software as by that only you can create or manipulate anything.
Canvas :
By its name it is clear that it is the place where you can create your projects. This is your working area where you can create what you want.
Floating Docks :
These docks can be move anywhere according to your comfort. Every panel can be converted into floating dock.
Layers :
Layer is again an important part of Photoshop. As the name you can understand that you have to arrange your project work in layers. It is really fun to work on layers and it make your work much simpler. You can properly organize and execute your work by the help of layers.
It is just an overview of Photoshop and its Work space, these options are base for your Photoshop learning .So in coming tuts we will explain their proper working in detail, we want you to get familiar with these and then get start with your creations.
TUTORIAL IN DEPTH
Hi, this is our first chapter of Photoshop basics. It is like foundation of this course, here you will understand that what is Photoshop all about. Is it only an another editing software.
Actually no, Photoshop is a giant graphic software by which you can do wonders and unleash your creativity.
As it is a giant software, so it is important to understand its working and its mechanism.
Lets see how Photoshop is arranged and its interface.
Main Menu
Main Menu is an area from where you can reach and activate any feature of Photoshop. It is categorized in such a way that you can easily reach to your desired feature. Every menu is well named and meaningful so that you can’t get confused in it.
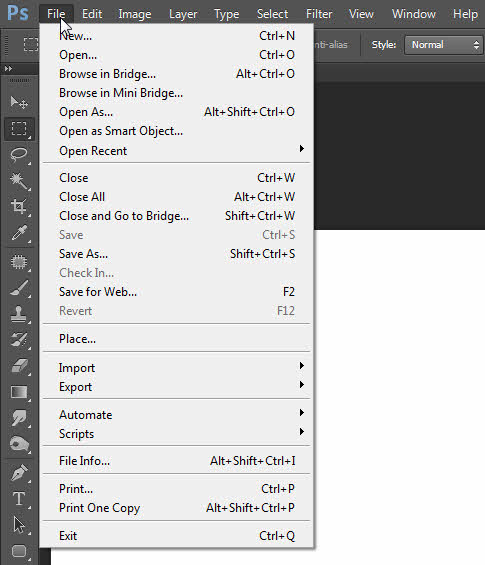
Like It start with file menu which has everything related to document opening, closing, save, save in different formats, import export etc.
Like this only we have edit, image, layer, type, select, filter, view, window and help menu.
Window menu is one of the most important menu from where you can activate or deactivate any palette.
Option Bar
Below the main menu we have Option Bar, it is one stop area for options of every Photoshop tool. Every tool has options to have a control over its working.And much of options of tool is displayed on option bar only. When you select a tool option bar shows its own option only. So when you change a tool option bar also change according to it.
In Photoshop , you have some types of option controller by which you can change it, like drop out menu, slider and text box.
On left corner you can see particular tool icon and in it you can see its preset if that tool have any. After that you can see its options.

ToolBar
In left of Photoshop window you will see toolbar, Now this area is like a toolbox for you by which you have to create, draw, edit and all work starts from a tool only.
Tools are arrange in categories , like selection tools , shape and pen tools and like this only tools are arranged in tool bar.
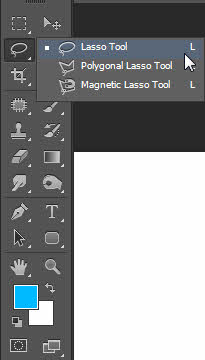
Some tools are placed within a icon only, as they all are related to each other.
Like in lasso tool icon you have lasso tool, polygon lasso tool and magnetic lasso tool. Icon of last use tool is visible on toolbar and to see other icon in that set , you click and hold that icon.
If an icon has a small triangle in its corner, it means it has a group of tools.
Canvas
Till now we see a main menu from where you can see every feature of Photoshop, after that we see option bar which shows options of every tool.
Then tool bar which consist tools by which we have to create or creations.
But like in real world painting or drawing we have tools like pencil, colors, scale, eraser but we want a area where we have create something, So like that only we want a area in Photoshop also.
In Photoshop we have canvas or you can say our virtual working area, on which you can unleash your creativity.
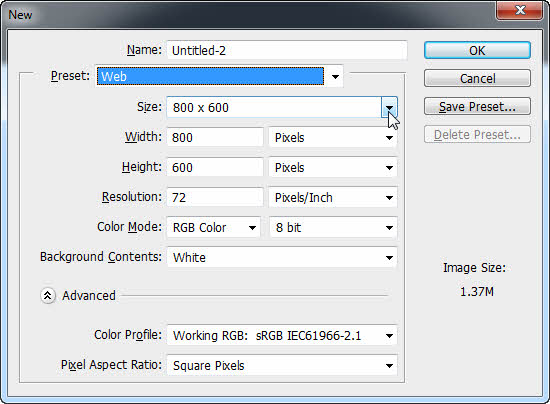
Now same like in real world we want a particular size of paper or canvas , we have options in Photoshop to set the size of our canvas.
We can set it when we are starting a new project. You have many presets also. It will be explained in next chapter in details.
When you are starting new project , there is an option to set background color, so that will be your canvas color or you can say background color you will get in start.
You can also change your canvas size again while working on project.

You can change it in image menu and then select canvas size, its shortcut is Alt+Ctrl+C.
Floating Docks
Floating docks are something which make Photoshop a fully customizable software, Docks are palette of different tools and features of Photoshop. As they are floating you can put them anywhere according to your comfort. can change their size, or expand and collapse them.
You can also attach different docks.
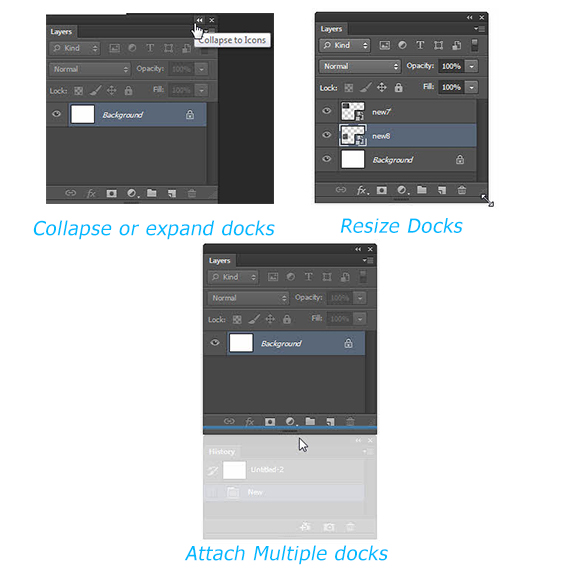
- To collapse of expand click on arrow on right top corner of dock. when you collapse it , it turns into an dock icon.
- To resize floating dock, take your cursor on its corner, you can see a two sided arrow mark, drag it and by this you can resize any floating dock.
- To attach multiple docks, just take dock below another dock, and a blue line appear, just drop dock and both will attach like this only you can arrange all floating docks.
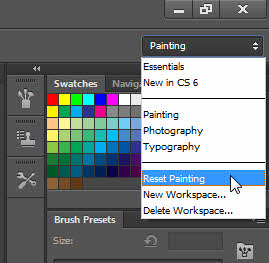
You can also reset all dock position or make a new work space. In right top corner here is a drop out menu , in this you will see some presets , like painting, photography, typography, all set your work space according to your specific need.
Like painting activate and arrange all floating docks related to painting.
Layer
Lastly we have layers which make Photoshop different from many Softwares.
Layer has its own panel or you can say a floating dock. It has all options related to layers.
Now layer means you are working on different steps, at any time you can change any step.
So it make your work easy and systematic. Every new layer is a transparent layer, means you get a transparent area on which you have to start with your creation.
Layer is not only a creation layer , here is one more layer that is Adjustment layer, which is combo of color correction and masking combo with in a layer.
In coming tutorial you will learn layers in details. So now get familiar with all these features of Photoshop before starting a creative journey in it.
We also have its video in top of the page. You can refer to that video for some practical explanation. You can ask your questions anytime, just comment on particular topic and our team is always there to help you and clear your doubts.
Thanks for visiting tooltutorial.com, have a creative journey with us 🙂


