TUTORIAL IN DEPTH :
Solid Color – This adjustment layer is not related to any color correction, it is just like overlaying a solid color on whole canvas, with a layer mask on layer. So if you want a layer filled with solid color , and a layer mask on it, you can directly have this adjustment layer. You will find it on the top of adjustment layers list. You can also change that solid color any time you want to change.
Gradient – It is again a adjustment layer which is not a color correction , but just a type of overlaying layer. It has also a layer mask which is an essential element of adjustment layer, and more over you can change gradient at any time. It is just like having a layer with gradient on a layer with a layer mask but again benefit is that you can change its gradient properties anytime.
You can learn about gradient and solid color in Painting Chapter. For now solid color is only a single color, and gradient color is flow of color, flow can be in different types like radial, linear etc.
Pattern – It is same kind of adjustment layer as solid color and pattern, in this adjustment layer also we can add overlaying pattern. A layer with only pattern and layer mask. You can choose pattern from presets and can change them anytime. So you can choose these adjustment layer to fill color , gradient , or pattern , with a layer mask.
After this we will have popular layer adjustment, which are widely use as color correction and in real means they are only known as adjustment layers. As they involve color adjustments.
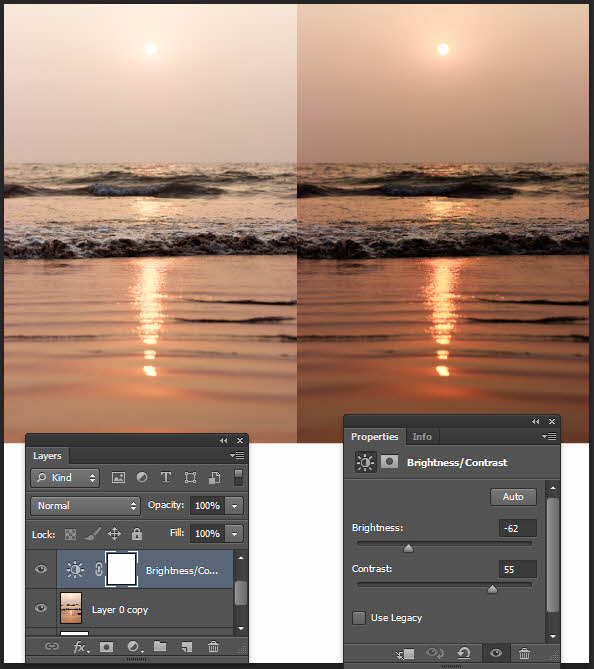
Brightness / Contrast – This is a very popular adjustment layer and color correction. You can use it simply that why it is popular among many of designers and hobbyist. You can change tonal range of any image very easily. Just adjust its brightness and contrast value. You can correct the brightness and contrast by this adjustment layer, or you can also have a dramatic view of an image. So it is all on you what you want by this adjustment layer, whether you just want to do a professional color correction of an image or you want to explore your creativity on this virtual canvas of Photoshop.
In below image you can see a dull and bright image is corrected by brightness and contrast. I decrease brightness and increase contrast to enhance the colors of image. You just want to move slider left and right to change value of brightness and contrast.
Moving towards right means positive and left means negative or decreasing the value.
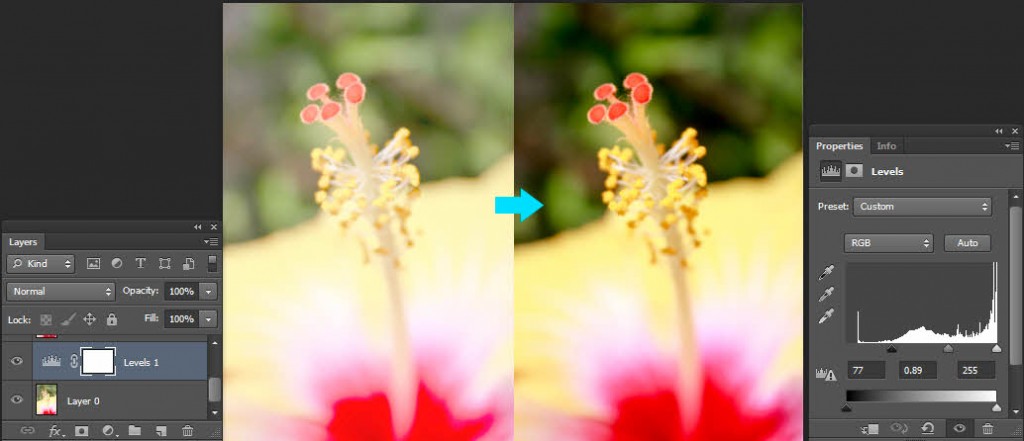
Levels – Every designer is aware of this adjustment layer, and I am sure if you are beginner it will be favorite adjustment technique for you, to enhance your photos. In level adjustment, you have three sliders, one to adjust shadows other to adjust midtones and third one adjust highlights. In level properties window you also have presets for color correction, like increase contrast, lighten shadows, midtone brighten etc. but if you want custom adjustment according to you, just use those sliders moving left slider ( shadow) towards right will darker the shadows , moving right slider (highlight) towards left will increase brightness, and moving mid slider (midtone) will effect midtones of image, moving it left will effect darker and moving it in right direction will result in brightness.
You can also work with a particular channel, just select RGB and a roll out will be shown in which you have options, RGB , Red , green and blue.
RGB is by default but you can also choose red channel and adjust its levels.
In below image you can see a dull image on left and on right I correct colors of image with levels, You can see , slider of shadow is moved towards right to darken the shadows, and midtone slider is also moved to right to brighten the midtones of image.
As this all is about color correction so where is role of adjustment layer, actually you can change specific adjustment at anytime with this adjustment layer, and as you get a layer mask in it you can define the area which will be effected by that adjustment. You can learn Masking in details in Layer masking Tutorial.
Curves – Another way to adjust tonal range of image, and curve is again a very popular adjustment technique among designers and Photo Editors. Same as levels you can set shadows , midtones and highlights of an image. In levels you can only adjust three points or can say three sliders, but in curves you can add as many points on a line to adjust shadow , midtones and highlights with much more flexibility.
In curve box, you can see a straight diagonal line, that represents tonal range of image, now firstly add three points on it, just place cursor and click on that line, same as levels , your left point will be of shadows , middle is for midtone, and highlight is on right side.
You can also add more points to have something more than normal adjustments. Just move those points and get your desired results.
Now ideal situation is a S-Curve for a contrast image, more deep “S” results in much more contrast image.
Same as other adjustments , curves also have presets, like strong contrast, negative, color negative etc.
It also has a auto mode which will adjust image contrast and tonal range automatically.
Same as Levels , we can adjust tonal range of color channels individually.
So if you want to good at color correction, Practice and understand curves, it is most flexible way to adjust tonal range.
Same as other adjustments, you can end up with basic correction , or just use auto mode and presets, or you can explore the creativity with a line with points, everything is in your hands. I always said don’t hesitate to experiment, may be it will come out as your own discovered effect.
Exposure – It is another way to adjust highlights, midtones, and darken areas. So basically it did same work as above adjustments did, but with a different technique. Here in exposure window you will see three slider options, that are exposure, offset and gamma. Exposure is to adjust highlight of image , offset is to adjust midtone and gamma is to adjust its darken area or you can say shadows.
Exposure word is also very common to photographers, as when we are doing photography, it’s our priority to get desired exposure, may be it will be normal exposure, over or under exposure.
In exposure window we also have preset like minus 1.0, minus 2.0 , plus 2.0, plus 1.0. It is simple to understand that like in plus 1.0 it will adjust parameter to increase exposure one time more.
It is a simpler way to correct the tonal range of an image, have a right exposure or you can also play with it to have something dramatic.
Vibrance – Now this is starting of another type of color correction adjustment layers, which are not for adjusting , exposure or tonal range of image, but it for adjusting the colors of image.
So starting with vibrance adjustment layer, it is a simple adjustment layer, will be activated same as others. Its role is just like saturation but somehow it is different from saturation. In its dialog box you will get both vibrance and saturation options. Now saturation is to adjust the intensity of colors, so by saturation you can adjust intensity whole image. Other side vibrance effect colors which are already muted, and don’t much effect already saturated colors. It is mainly useful when correcting image with skin tones.
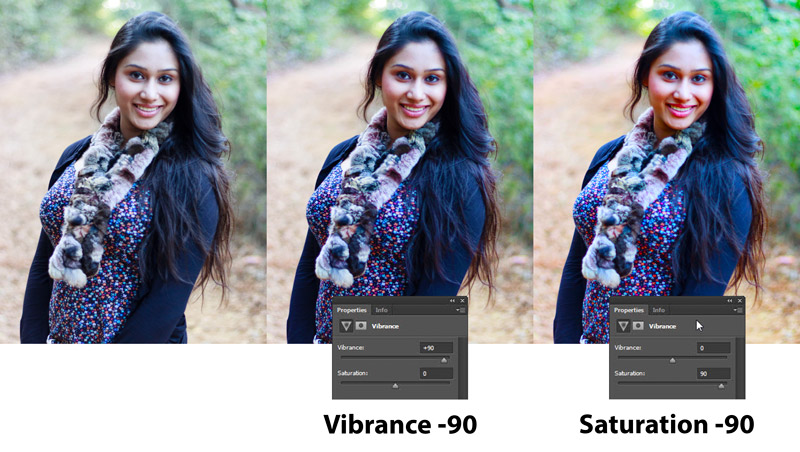
Now in this example you can understand why vibrance is used for adjusting skin tones. as saturation uplift the saturation in a manner that it feels odd.
Hue And saturation – A well known couple in graphic industry is Hue and Saturation, as we call romeo and juliet with each other, same like that in graphic industry hue and saturation has been called at one time. Jokes apart 😉 hue and saturation are basic terms to build up a color. One more thing is added to have final color is value, or you can say lightness.
These all are explained in Colors Tutorial. For now you can say that Hue means Color, every color in a rainbow means VIBGYOR is hue. Saturation is intensity of that color, and lightness means amount of white or black in that color. These three things makes a color.
So by this you can do wonders, as above in tutorial, I show how you can change color of a rose with this hue and saturation adjustment layer. Just like this you can explore your creativity with these color adjustments.
Color Balance – Another layer adjustment, related to color correction. It is just like applying tint on image. But as in Photoshop nothing is for time-pass, so here you can change or apply tint of midtone, highlights and shadows. And can change these colors separately for each specific channel of RGB, red green and blue.
You can do normal color correction with this, like you can correct the blue cast which usually added by cams in auto mode. You can also use it for making some dramatic images, like all image with magenta tone, or yellow overlaps every color, so its on you what you want from it.
Here in below image you can see , that once I move slider of midtones to red, and in another to blue, so by this you can see red and blue effect on images. Like this only you can do according to your desire.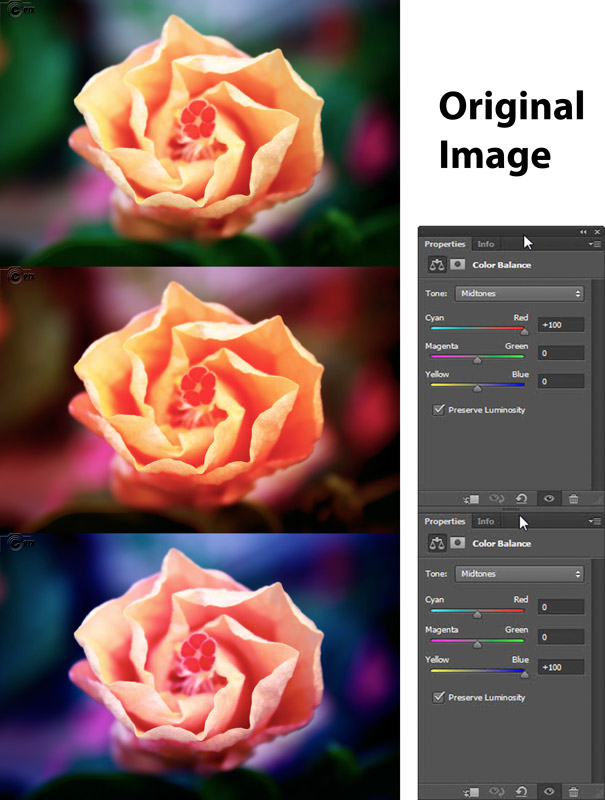
Black And White – One of the most popular color adjustment these days. We want special black and white effects on our images, or color splash effect. Everything is possible with this adjustment layer. You can turn your images black and white , with control over each color in image. You can adjust amount of black or white for each color , like if you want red color in image should be more black , and green should be grey, and some other have to be white. Then everything is in your control.
Just move sliders towards white or black for different colors.
Like this also you can give color splash and selective color effect, as with the layer mask it is possible to limit the visible area of the particular adjustment.
This has been explained above in tutorial.
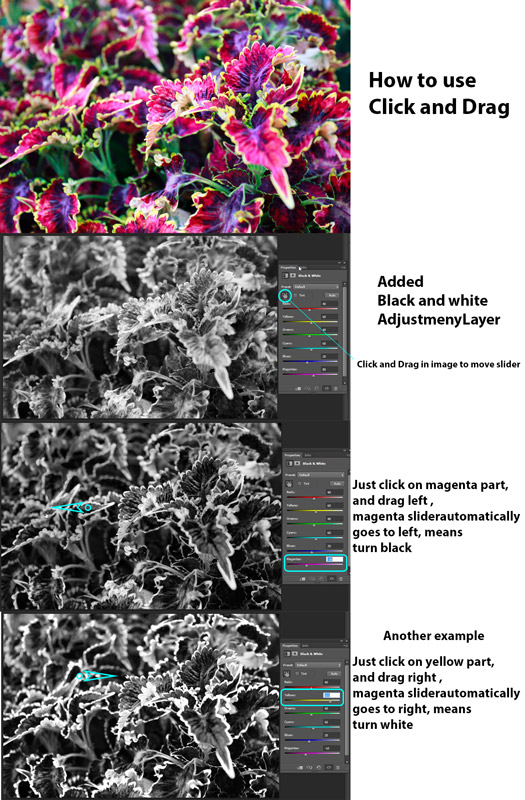
One important and interesting option in this pallet is “Click and Drag in image to move slider”
You just have to click on image, click on that color area which slider you want to move, and drag mouse in left direction to make that color black, and right to make it white.
Here below i have given a example with this image, where I added black and white layer adjustment, and click on magenta color on canvas, and drag mouse pointer to left and magenta color slider goes to black side, and you can see that in image that magenta portion of leaves turns black.
Just like that with yellow, I click and drag to right for making it white.
In black and white you can also see tint option, which gives you effects like sepia and overlay of other colors. Moreover you also have presets , in which you can choose anyone relevant to your need, but to have your 100% desired effect do it manually only.
Photo filter – It is just like putting a color filter in front of your camera lens. It is used to change image color temperature. Or sometimes you can use it to match two different images of different situation.
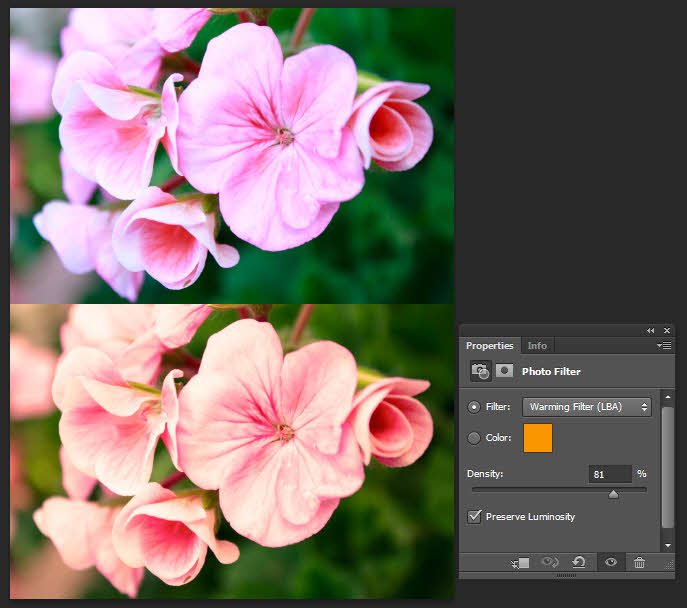
You can choose color which you want to be effect on image, for example to make a sunny day situation , you can use orange color and for night deep blue color. There are also some presets like warming filter, cooling filter etc, you can adjust their density or can say effect of that color on image. You can also select any specific color.
Below in image you can see how photo filter is used to give day light effect. So use this adjustment to give new mood to your photos.
Channel Mixer – This adjustment layer is another way to add tint to an image, and high quality monochrome. So you can use it as an extra option. Actual its upto you, that actually what you need. There are several options in Photoshop for a similar work with a different technique. So in this channel mixer, you can adjust RGB channels, that are Red, blue and green to give tint and for monochrome there is a checkbox, by checking it image will convert to grayscale and only gray channel present as output channel, you can adjust monochrome by the RGB sliders. Below in image you can see its box, one more thing present in it, that is Preset, it has some black and which presets. Below in image you can see the effect of threshold, how it works and just move that slider to have desired output.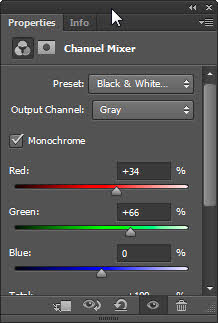
Invert – From here a new section of adjustment layer starts, no color correction, but just some photo effects or can say adjustments. In old days we have negative of our photographs. They were like horror images, these days sometimes Invert or negative created digitally which are used for showing something like flashback and horror. So it is one step effect, just choose invert from adjustment layer and here you get invert image without any options in dialog box. Below in image you can see example of invert. So show some creativity with this , and come up with your creations, don’t forget to upload your work on our FACEBOOK PAGE best work will be showcased on homepage of our website.
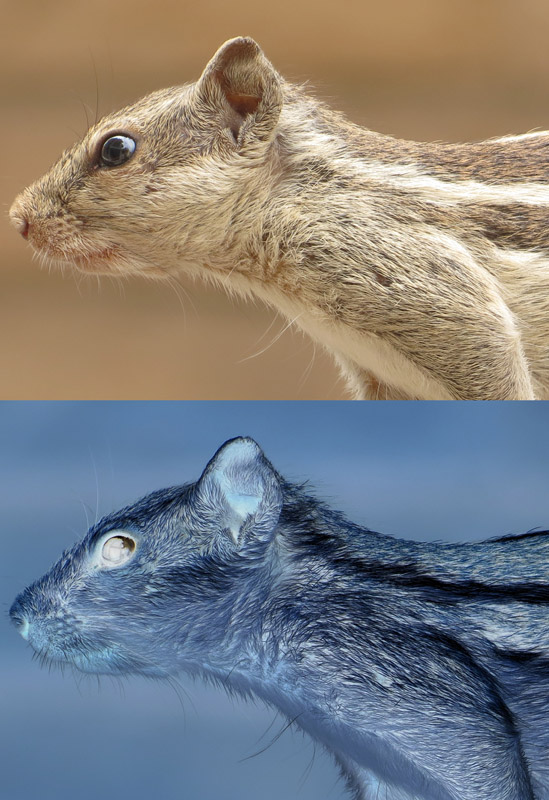
Posterize – It is a quick technique to adjust number of colors in a image or you can say number of tonal levels. Like if you keep number to 5 , it means 5 color of red, 5 green and 5 blue. Usually in 24 -bit model there are 256 colors for each channel, so you can adjust it by this quick technique. You can learn about pixels and colors in details in Introduction chapter. For now, less number of colors means low quality, more colors give a continuous flow of colors. Just set level in its dialog box, no. of level means number of colors of each channel.
Threshold – It is another adjustment layer, with a interesting technique. Now , what threshold actually do, it converts an image to black and white. Wait if you make up your mind to Grayscale image, so no actually it convert image to just two color Black and White without any gray shade.
It works according to the shade of image and then come up with a plain two color image.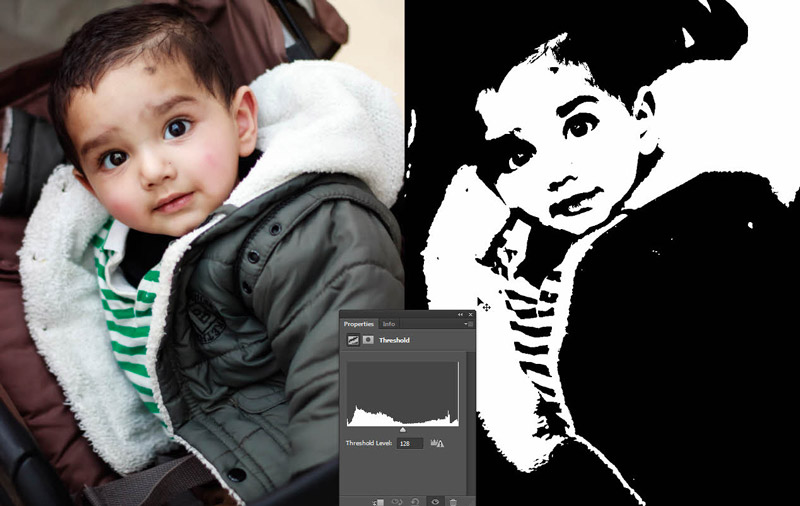
Gradient Map – As its name suggests, it is related to gradient. In adjustment layer list, we have gradient in top also, but it is much differ from that one, and it is an interesting technique.
What gradient map do? We have flow of different colors in gradient map, so one side of gradient replace, dark area of image, other side replace bright areas and colors or shade in middle replace midtone of image.
Now by this simple technique you can create many interesting effects and do lot of things with your images.
Like in below image I use gradient of two colors, violet and orange, and you can see shadows are replaced by violet color and highlights are replaced by orange color.
You can learn about gradient in detail in Gradient tutorial.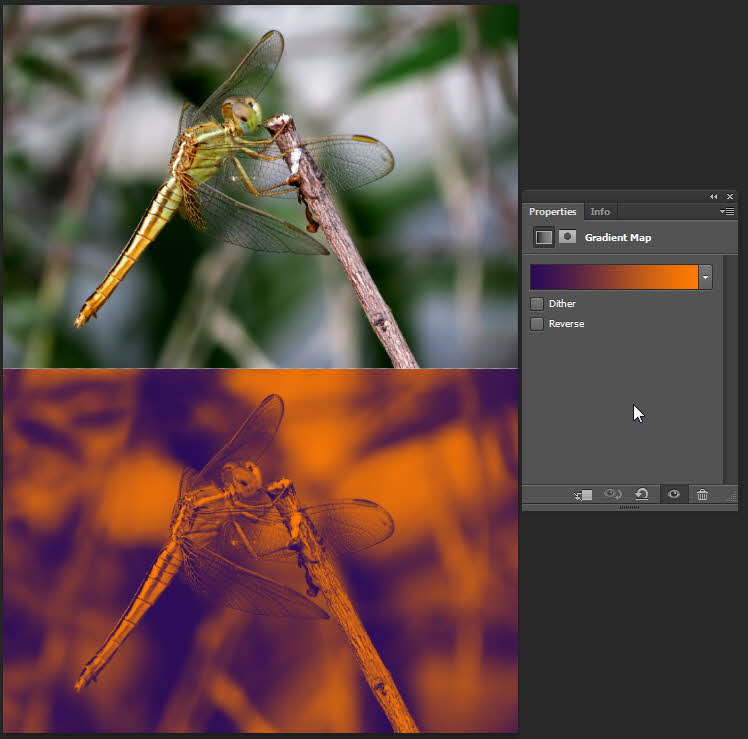
Selective Color – By this technique you can set amount of a specific primary color, without changing other primary colors. You can change colors for each channel.
Here we end up with this tutorial, hopefully you learn basics of adjustment layer, and know about their workings. Keep learning with us at tooltutorial.com . If there is any question regarding this tutorial, just post a comment on this tutorial, we are always there with answers to your questions.


