In this Abstract Wallpaper Tutorial, We’ll learn How to create beautiful abstract wallpaper just in few minutes. Photoshop is a software in which we can create simple graphics also exceptional! Photoshop Makes it easy to Create and Customize your own abstract Graphics which can be used as wallpapers and other graphical projects, in which Filters Play an important role. The Best Part of this tutorial is that this is abstract which means, you have to use correct filter and your creativity in this. If you are able to unleash your creativity then your wallpaper will be looking fabulous than mine.
FINAL RESULT :

So Let’s Start With this simple Tutorial :
Fast Forward Tuto! (Duration : 5 min)
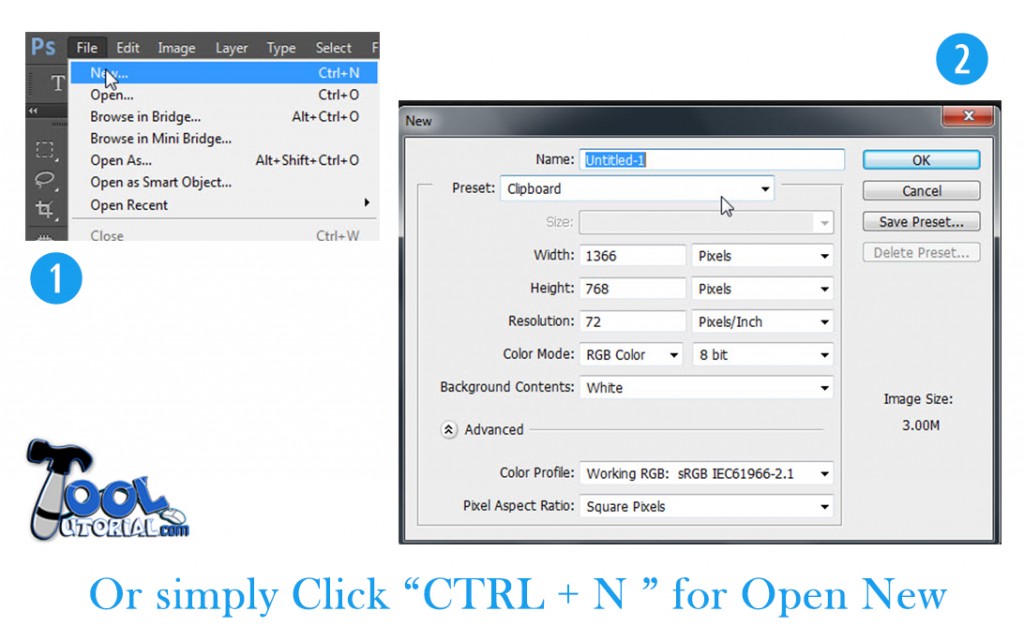
- Open New, then choose canvas size as your choice, Here 1366 x 768 .
- Go to Filter → Render → Clouds
- Go to Filter → Pixelate → Mezzotint → Short Lines ( Type of Mezzotint) , Then OK.
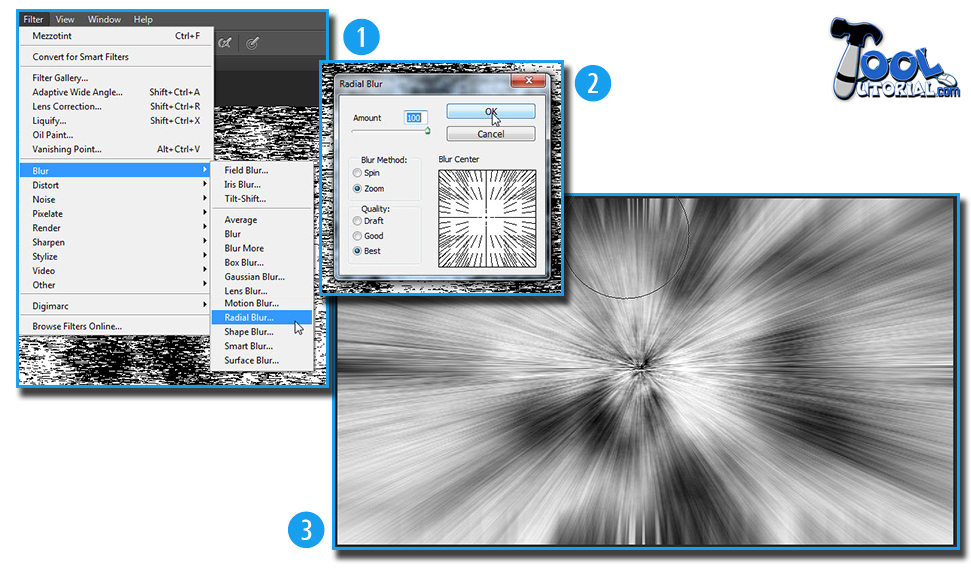
- Go to Filter → Blur → Radial Blur → (Amount = 100 , Blur method = Zoom, Quality = Best)
- Go to Filter → Distort → Pinch → (Amount = 100 % ), Then OK.
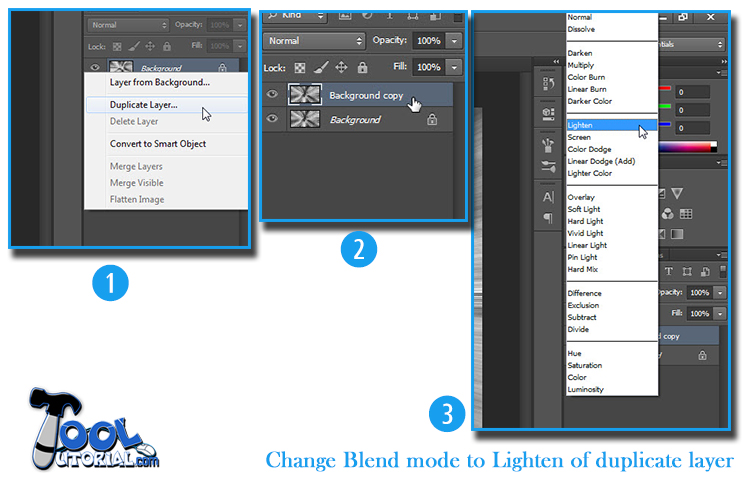
- Now Duplicate the Layer (Background Layer), and change the blend mode of duplicate layer (Background Copy) to Lighten.
- Select the Previous Layer Means Background layer and then Go to :
- Filter → Distort → Twirl → Twirl angle ( -999 ) and then Ok.
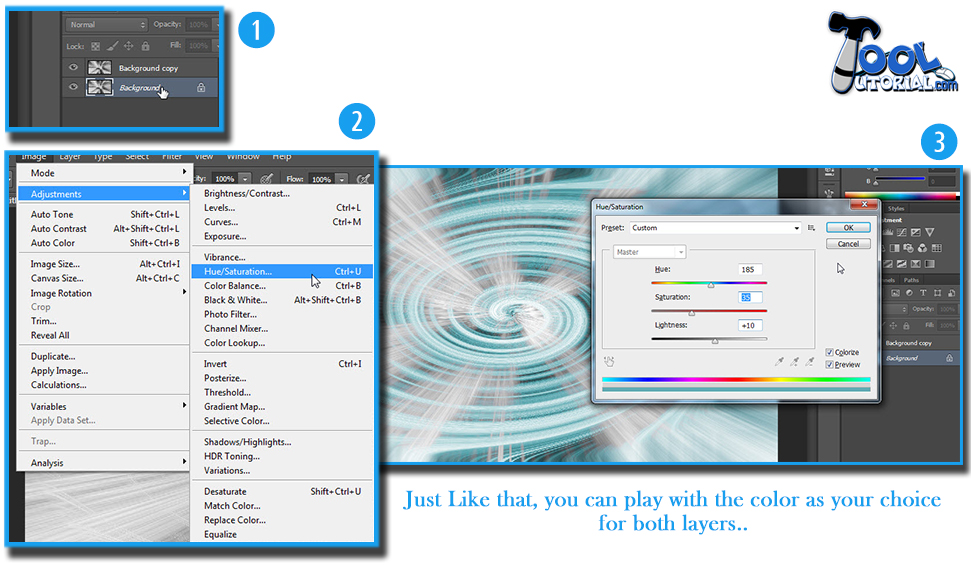
- For Colorize these layers, Go to Image (at top bar) → Adjustment → Hue/Saturation (Or Simply Press Ctrl + U )
- Tick on Colorize Box, In this Hue/Saturation Panel and Change Values as what color you want.
- The Same Colorize Process, you can do with the duplicate layer too, to make it more effective and attractive.
- You Can Choose others filters too like, Ripple , Wave, ZigZag Etc. for different design and abstract wallpapers.
EXAMPLES OF ABSTRACT BY THE SAME METHOD BUT DIFFERENT FILTERS :

TUTORIAL IN DEPTH :
STEP 1 : To begin, go to Main menu ( top of the screen) and choose New, New Document Dialog Box will be open, in which you can choose presets or in custom you can set width and height of the document or canvas. Here, Enter 1366 pixels for width and 768 pixels for Height. (You can Enter Any Value as according to your choice.) Other method is using the keyboard shortcut “ Ctrl + N “. For More Details, follow the image :

STEP 2 : Now Press “D” for set default foreground color (BLACK) and Background Color (WHITE). For More details about foreground and background colors Click Here. Now go to Main Menu and choose Filter, here the full panel of filter will be open, from this panel click on the Render and then Clouds. By its name, you get cloudy background on the layer. Remember it should be black and White Only.
Filter → Render → Clouds

STEP 3 : Now go to Main Menu and choose Filter, here the full panel of filter will be open, from this panel click on the Pixelate and then Mezzotint. Now What is the Mezzotint? It is the technique, in which metal printing plate that has been treated with a tool designed to produce a fine mesh of pinpricks that will retain ink. (No need to think too much 😛 ) Lets come to tutorial, In Mezzotint Panel, Choose Short Line Type and then Click on Ok. Still its Looks Ugly But Don’t Panic it will be Beautiful when it comes to end.
Filter → Pixelate → Mezzotint → Short Lines ( Type of Mezzotint)

STEP 4 : Now go to Main Menu and choose Filter again, from this panel click on the Blur and then Radius Blur. By this, this Flat thingy turns to more interesting. In the Radius Blur panel, Choose Zoom in Blur Method , Best in Quality Section and Set 100% in amount. By this Option, it looks like zooming into a certain point.
Filter → Blur → Radial Blur → (Amount = 100 , Blur method = Zoom, Quality = Best)

STEP 5 : For more Zooming, Or you can say if you want to pinch it more, Just go to the Main Menu Again, Choose Filter and then Choose Distort in the filter panel. In the Distort Choose Pinch. Set the amount of the pinch value to 100. Now it shows motion in it.
Filter → Distort → Pinch → (Amount = 100 % )
STEP 6 : Now it looks Smooth and Sharp. Now Duplicate this layer ( Background Layer). You Can Duplicate the layer, by Simply right click on the layer and choose Duplicate Layer. The Other Method is to do the same, Just Drag the Layer on the New Layer Icon in Layer Panel (Bottom of the layer panel at right hand side). One More Option, Select Background Layer and Press Alt Key with Any other Arrow key, Means “Alt + Any Arrow Key”. For More Details About the duplicate , delete and other options related to the layer just follow the Basic Layer Chapter.
After Duplicating the Layer, Just Select The Duplicate layer (Background Copy) by simply click on the layer and the change the blend mode of the duplicate layer, from normal to Lighten. For More Details, How to change Blend Mode of the layer and other blending properties, Just Follow the Blending Mode Chapter.

STEP 7 : After Changing the Blending mode of the duplicate layer. Select the previous layer, which is Background layer. And then go to Filter, In Filter Panel choose Distort and select Twirl. You can choose any effect as according to your creativity. My Suggestion is try this effect with different filters too. Beginners can follow Filters Chapter to know more about the filters. Come Back to this effect, as we selected twirl, put -999º angle value for the twirl, you can put any other value as your need. More Value means more twirl in image. Positive angle value means, the Direction of twirl is in clock-wise Direction and negative value of angle means, direction of twirl is in anti-clock-wise direction.
Filter → Distort → Twirl → Twirl angle ( -999 )

Now it should look like this, the Background layer and Duplicate layer are merge with each other, not because of this Twirl, but because of changing the blending mode to “lighten” of the duplicate layer, which we did in the STEP 6. Now your abstract is ready. Now time to fill color in this black and white abstract.
STEP 8 : Now Select the same layer (Background Layer) and then go to the Menu bar (top bar) and choose Image. Go to Adjustment in the image panel and then choose Hue/Saturation. Other method is using the keyboard shortcut “ Ctrl + U “. hue/saturation Window is open now, Before changing the value of hue,saturation and lightness, Check the Colorize Box on the right bottom of the window, Just above the preview Box. Here you can see Hue, saturation and Lightness sliders.
By these you can control all these parameters. Now What is Hue? Hue is the colors that we see in the rainbow. What is Saturation? Intensity of color is called as saturation. For More Details Follow Color Adjustment Chapter. Now Change the Value as You want to fill the colors in your abstract. Blue color is filling by me here. Slide saturation slider for change the grayness of the color to dark or light as your need. By the Lightness slider you can change the light amount in your abstract.

Just as the same you can change the color of duplicate layer, by select the duplicate layer and then go to Main menu and choose image and then Hue Saturation. Remember to check the Colorize Box Always. otherwise it is act as gray-scale mode. After it, change the Values to Purple color. And maintain the saturation and lightness Value as your need.
After Completing this abstract wallpaper, you can change the color by change the blend mode too. Sometimes Your abstract gives you the exceptional feel by changing the mode to overlay or any other blending modes So Play with these Blending mode and set what more suitable to your wallpaper. As the name of this tutorial, we never know what make our effect more attractive.
So, Here we come to end this tutorial. If you still want to know more about it continue to More to Know Section, Where Other Important tips are waiting for you, to create more and more beautiful wallpapers. As I always believe that If Photoshop is happy with you, you never know that what Photoshop gives to you. Just Connect with Us and Create Your Own simple Beautiful wallpapers for your projects Or for fun! For any Queries or doubts just Ask Below in the comment Box.
MORE TO KNOW :
By the same Procedure, Here is the another example but little more attractive :
Image 1 (Small Image) : Effect created by the same procedure, which is explain above in this tutorial. In this on the Background layer (First Layer), I applied Twirl Filter, Negative Angel. But on the Duplicate layer ( Background Copy) after change the blend mode to lighten, applied Twirl Filter , Positive Angel. After Changing the values of saturation and hue on both layer , the above result was coming Out. It looks Nice in it self But Still If you want something more, the other image abstract is still easy.
Image 2 : After Creating the Image 1 effect, Simply go to File and then choose Save for Web And Device and save it at jpeg format. Other Method is using the keyboard Shortcut ” SHIFT + CTRL + ALT + S ” . After It open the saved Image in Photoshop. Go to File and Open it.
Now the abstract wallpaper (created before, like Image 1) is in your canvas. Now Go to the Main Menu ( Top bar) , Select Filter. In Filter Panel Choose Distort and Select Twirl. Set the angle of twirl to 240º for the same result as in image 2. You can Change the Value Of angle for more or less twirl as your need. If you’re user Friendly with Photoshop, Play with the Brightness and Contrast Options as well for dark or light the Abstract wallpaper. You can Play with HDR toning too, which is beautiful options for wallpapers. Go to Main menu then choose Image, then Adjustment and then HDR toning. Here you Can Play Edge glow, curves and toning which gives sharp and effective result to your wallpapers.
It’s Time to Create More abstract wallpapers, Create your Own wallpapers and share with us on our Facebook Page. For any Question or Doubts, Feel Free to ask below in Comment section.


Thanks so much I made one
great 🙂 be updated with tooltutorial.com